Chapter 02: Introduction to PHP
Introduccion practica a PHP para aplicaciones web: entorno, sintaxis, variables, tipos, funciones, formularios y base de datos.
Introduction
In this chapter we'll cover the installations needed to configure our development enviroment, and start learning the language.
I recommend you to try to type the code instead of copying it. It may seem like a waste of time, but it will help you to memorize the syntax and feel comfortable with PHP.
Development environment
In order to work through the book, we will need:
- A web server capable of serving php files, such as Apache or IIS.
- A database server, we will be using MySQL for all our examples.
- A text editor or IDE to write the code of our applications.
A good option to configure our development environment is to install an application called xampp.
For those who don't know, xampp allows us to configure our local machine with Apache, PHP and MySQL; quickly and easily.
In addition, it is available for the main platforms, so we can use it whether our environment is Windows, Linux or Mac.
Installing xampp is very straightforward. After finishing the install process, you should be able to start the control panel (Figure 3).
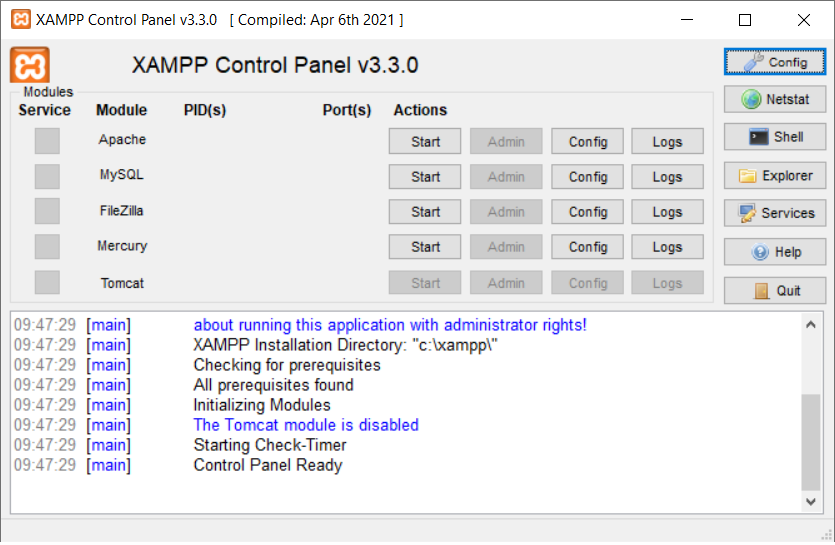
Just press Start next to Apache and MySQL. They are our web server and database server respectively. Now you can open your web browser and type: http://localhost/phpmyadmin. You should see the screen shown in Figure 4.
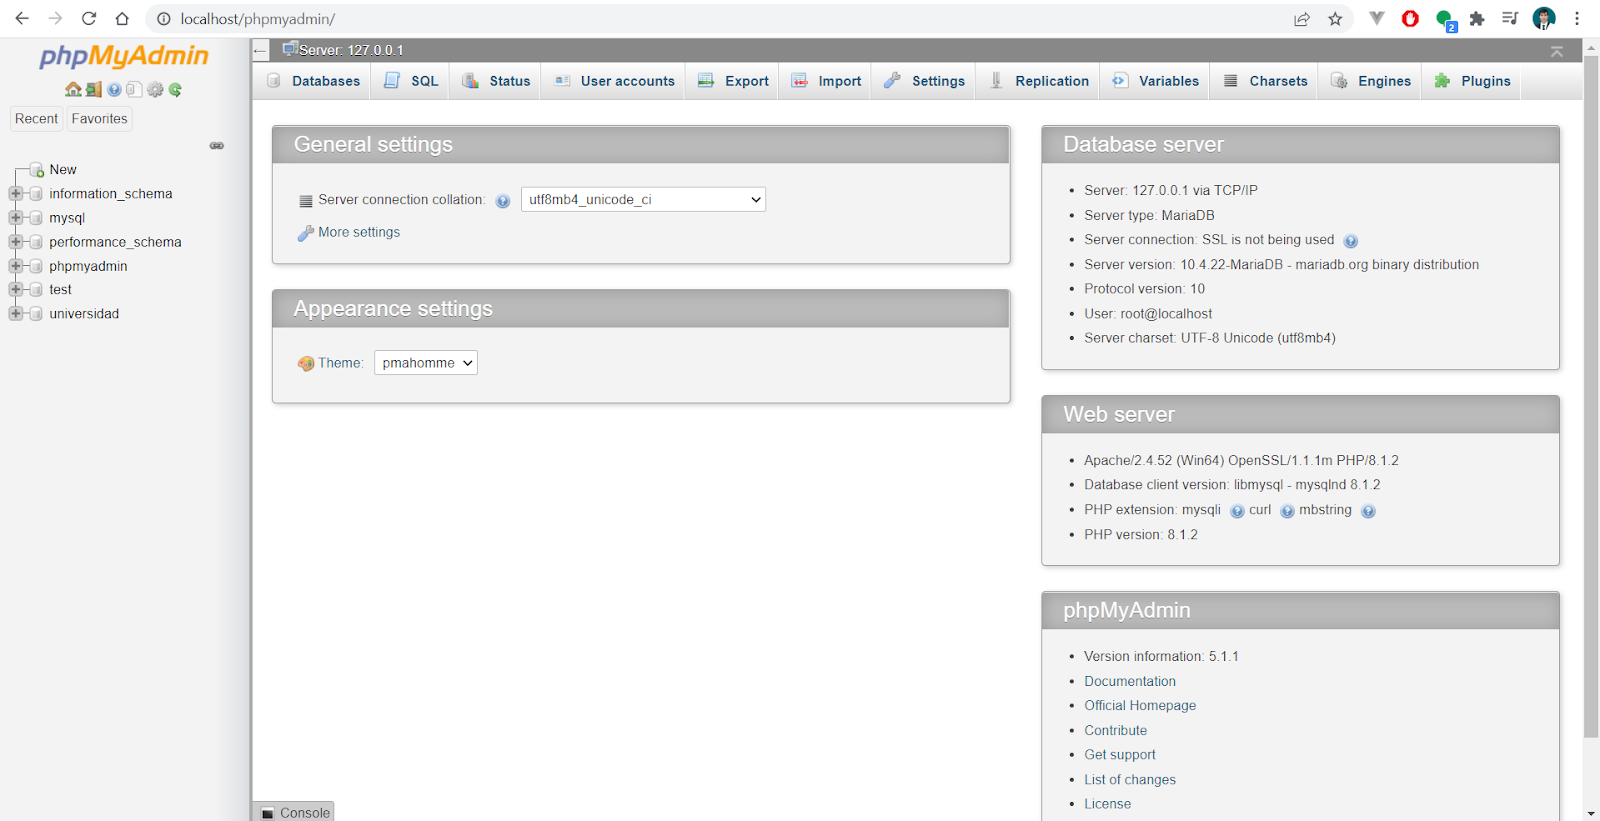
Note: If you are unable to start Apache and/or MySQL, one possible reason is that the default ports are in use by another application.
In the case of Apache, you can click on Config (Figure 5).
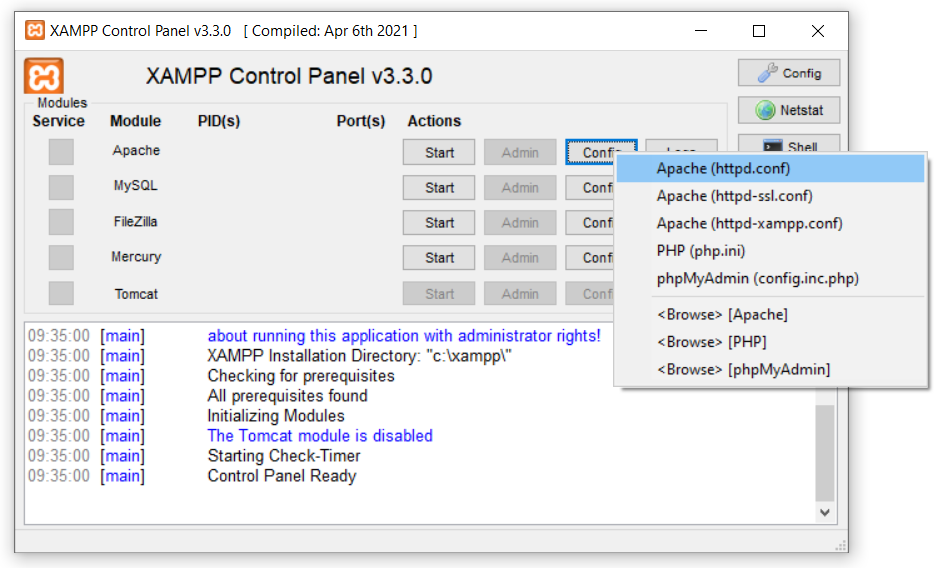
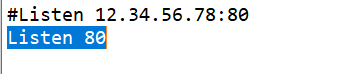
And then httpd.conf. A text file will open, where you can change the port the application is listening to, for example, from 80 to 8080 (Figure 6).
phpMyAdmin
phpMyAdmin is a web application packed into xampp, that allows us to create and manipulate databases in our development environment. It’s very useful, and enough to get started, but with time it can become limited. I strongly recommend using another tool. For example, DBeaver Community Edition is a very powerful tool. You can try it and see if it fits you.
Where to put the exercises
All the code that we want to be interpreted by Apache will go inside the htdocs folder, inside xampp. This represents our document root.
Let’s start by creating a folder named “php-bases” inside htdocs. We’ll be placing all of our scripts there.
If you are on windows, the path should look something like this: C:\xampp\htdocs\php-bases
On the browser, you can access the site by typing http://localhost/php-bases.
You can shorten this by creating a virtualhost for this if you like. Although it’s not mandatory, I’ll show you how you can do it under windows. Remember, these steps consider that you’re using xampp.
You need to go to the folder: C:\xampp\apache\conf\extra
This could be different if you have installed xampp on another path. Inside the extra folder, you will find a file named httpd-vhosts.conf. Open it.
At the bottom of the file, add these lines:
<VirtualHost *:80>
    DocumentRoot "C:/xampp/htdocs/php-bases"
    ServerName php-bases.test
</VirtualHost>
Next, you need to edit your hosts file. It’s located on C:\Windows\System32\drivers\etc
You need to open it with administrator rights. At the end of the file, add the following line: 127.0.0.1 php-bases.test
These will allow you to access the site by typing php-bases.test on the browser. You will need to restart Apache if it’s running.
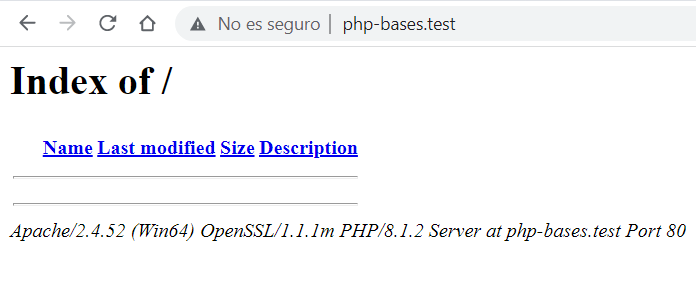
Now, you can open the folder with your IDE or editor. I’m using Visual Studio Code.
In order to generate dynamic content (ie on demand), the PHP code must be executed on the server; being able to be included or "embedded" within the HTML code; or hosted on the server as a separate file.
In either case, executing the PHP code will produce HTML output, which will be sent from the server to the client. Only the HTML output will be visible to the client, not the PHP code that produced it.
When the code is included within an html page, there must be a way to delimit it. We do it with the following tags:
<?php
// PHP code goes here
?>
The closing tag is not mandatory, and in fact not using it can prevent some header issues when using and including multiple files.
Syntax
Let’s start by creating a folder named basics. Inside that folder, let’s create a file called syntax.php with the following content:
<html lang="en">
<head>
    <meta charset="UTF-8">
    <meta http-equiv="X-UA-Compatible" content="IE=edge">
    <meta name="viewport" content="width=device-width,
        initial-scale=1.0">
    <title>Syntax</title>
</head>
<body>

</body>
</html>
As you can see, this is pure html code. No opening or closing php tags. Let’s add the following line between the body tags:
<?php
    echo "<h1>Hello World!</h1>";
?>
This will give you the following output (Figure 8):
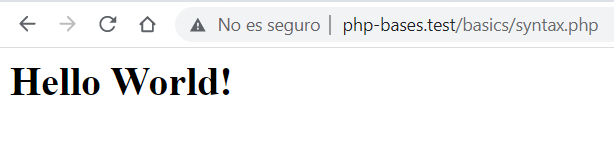
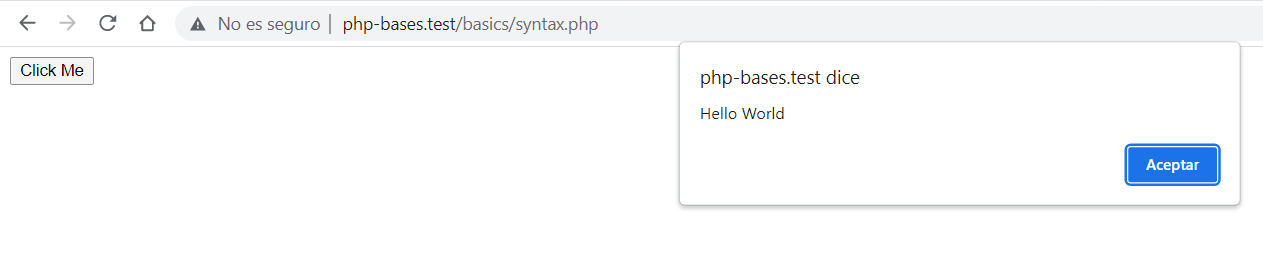
echo is a function that produces an output. It can take many parameters, although generally you will not use it like that. As you can see, you can produce html tags. In fact, you can write an entire html page using echo, but that’s not the normal way of working with the function. As an example, replace the line with the following:
echo "<button onclick='alert(`Hello World`)'>
    Click Me</button>";
Note that inside the alert, I’m surrounding the message with backticks. I could have used simple or double quotes, but in that case they should be escaped with a slash . If you refresh the browser, you should see that the button works (Figure 9).
Comments
There are basically two types of comments you can use: single line, or multiple line:
// This is a single line comment

/*
This is a comment,
spanning multiple lines
*/
Everything between /* and */ will be ignored.
Variables
A variable is a symbolic representation of a memory location to which any value or data can be assigned; We can think of a variable as a container for a piece of data or a set of data. During script execution the variable can change both its type and its value. In PHP, the $ character is prefixed to variable names. A valid name must begin with a letter or underscore, followed by any number of letters, numbers, or underscores. Variable names are case sensitive, so $var and $Var will be interpreted as two different variables.
As in any programming language, it is convenient to choose meaningful variable names, which increases the readability of the code.
Create another file called variables.php with the following content:
<?php
$first_name = "Jon";
$last_name = "Snow";

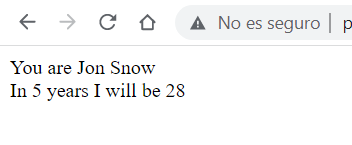
echo "You are $first_name $last_name";
As you can see, the variables are replaced with the corresponding values. This happens with any variable between double quotes. It’s called expansion of variables. Of course, we can store different types of values in variables, and perform operations with them. Let’s add the following lines to the file.
$age = 23;
$gap = 5;
$future_age = $age + $gap;
echo "<br>";
echo "In $gap years I will be $future_age";
You'll see the output shown in Figure 10:
PHP is a loosely typed language.
That means we can do this:
$gap = “Now is a text”;
And we’ll get no errors. It also means that in the case of functions, we could potentially pass a value of an incorrect type. We’ll see how to avoid these problems later.
Types
The data types that a variable can store are the following:
- Integer Positive and negative integers
- Float Decimal or floating point numbers
- String Text strings
- Boolean True or False values
- Array Special type of collection of values
- Object Special type of complex data
The size of integers and floats is platform dependent. This means that the number of bits used to store an integer or a float will depend on the machine where the script is executed.
Converting types
PHP is a language that performs type conversion based on the operands and the operator. To see the type of a variable we can use the gettype($variable) function.
If you still want to force the conversion of a variable to a certain type, you can use the settype($variable, 'variable type') function.
<?php
$var = 10;
echo "\$var has the value $var and is a " . gettype($var);
?>
The output produced is as follows:
$var has the value 10 and is an integer
Note the backslash in front of the variable, this is to prevent its value from being displayed as is the case with variables inside double quotation marks.
Constants
These are data whose values remain constant throughout the execution of the script and that you may want to use a large number of times. They are declared as follows:
define("constant name", value);
The name of a constant follows the same rules as that of a variable, and like variables, it is case sensitive. It does not have a dollar sign in front of it.
Operators
An operator receives one or more expressions, and returns a value from them. The precedence of the operators indicates which ones will be applied first, that is, how the expressions will be grouped. For example 2 + 3 * 5 = 17, because the multiplication operator has higher precedence than the addition operator. The following table shows the operators ordered from highest to lowest precedence. Those on the same line have equal precedence.
| Operator | Type | Associativity |
|---|---|---|
| () | Parentheses | No |
| ++ -- | Increment / Decrement | Right |
| ! | Logical | Right |
| * / % | Arithmetic | Left |
| + – . | Arithmetic and string | Left |
| << >> | Bitwise | Left |
| < <= > >= <> | Compare | No |
| == != === !== | Compare | No |
| & | Bitwise | Left |
| ^ | Bitwise | Left |
| && | Logical | Left |
| ? : | Ternary | Left |
| = += -= *= /= .= %= &= != ^= <<= >>= | Assignment | Right |
| and | logical | Left |
| xor | logical | Left |
| or | logical | Left |
Associativity means that the expression is evaluated from left to right, right associativity means the opposite.
Control Structures
structures allow us to vary the "flow" of script execution, which would otherwise be sequential; giving it a dynamic that otherwise would not have. In addition, they offer the possibility of repeating a set of actions as many times as desired or necessary.
if
if is a control structure used to make decisions depending on whether a condition (or several) is met or not. Its basic structure is as follows:
if (condition/s) {
// actions to perform if condition/s is/are met;
}
else{
// actions to perform if condition/s is/are not met;
}
Example
Create a filled called if.php with the following content:
<?php
if (strstr($_SERVER['HTTP_USER_AGENT'], 'Chrome')) {
  echo "You are using Chrome";
} else {
  echo "You are using " . $_SERVER['HTTP_USER_AGENT'];
}
?>
The script checks whether the user is using Chrome as a browser or not, and displays a message in each case. Again the $_SERVER superglobal array is used, and within it the 'HTTP_USER_AGENT' variable that contains information about the browser of the person accessing the page. Note the use of the function strstr('source_string', 'string_to_search'), which searches for one character string in another, and returns 'true' or 'false' according to the search result.
switch
Used to compare an expression with different values. It is similar to multiple if statements one after the other. Its syntax is as follows: switch(expression){ case value1: statement to execute when the expression has value value1; break; case value2: statement to execute when the expression has value value2; break; default: statement to execute when none of the above conditions are met; }
Note that it is necessary to include the break statement after each comparison, otherwise the execution will continue with successive comparisons. It is unnecessary after the default statement.
Example
Save the following as switch.php
<?php
$age = rand(15,18);
switch ($age) {
case 15:
echo "You are 15 years old, you are not of legal age";
break;
case 16:
echo "You are 16 years old, you are not of legal age,
    but there is less to go";
break;
case 17:
echo "You are 17 years old, you are not of legal age,
    but almost";
break;
case 18:
echo "You are 18 years old, you are finally of
    legal age!";
break;
}
?>
The function rand(int min, int max) returns an integer between the indicated limits, including these.
For loop
The for loop is used to repeat the same operation a given number of times. Its syntax is as follows: for(initialization; condition; update){ statement to execute while the condition is true; } Let's analyze its 3 parts:
Initialization: It is executed only when the loop is started for the first time. In this part, the variable that will count the number of times the loop is repeated is usually placed.
Condition: It is the condition that will be evaluated each time the loop starts. This condition is what determines the length of the loop.
Update: It is used to indicate the changes that we want to execute in the variables each time the loop is executed.
An example of its use would be the following:
<?php
for($i=1;$i<=10;$i++){
echo "The current number is " . $i . "<br />";
}
?>
In this way I would write all the numbers between 1 and 10.
While loop This loop is used when we want to repeat the execution of some statements an indefinite number of times. Its syntax is as follows: while(condition){ // statements to execute }
To better understand the use of while we will use the following example:
<?php
$i = 1;
while ($i <= 10) {
echo "The current number is " . $i . "<br />";
$i++;
}
?>
Does the same thing as the for loop in the previous example.
Do...while loop
This loop is used when we don't know the number of times a loop is going to be executed but what we do know is that at least once the action will be executed.
Its syntax is as follows:
do { // loop statement } while(condition)
break and continue
break
Used to escape the current for, while or switch loop. Accepts an optional parameter that determines how many control structures to escape.
continue
Serves to return to the beginning of the iteration from any part of the loop.
Functions
A function is basically a block of code grouped under a name, which can be called as many times as desired, and which usually returns a value as the result of its call. This allows you to reuse code, in an efficient way. Functions can receive values – called parameters – when they are called, and that will intervene in the value that the function returns.
The syntax of a function is as follows:
function name(parameters) { function instructions }
The call to the function has the following form: name(parameters)
Let’s see some examples. Create a folder named functions, at the same level that the basics folder, and inside it add a file may.php
We will create a function that receives two numbers and returns the larger one.
<?php
function greater($val1, $val2)
{
if ($val1 > $val2) {
return $val1;
} else {
return $val2;
}
}
echo "The greater of 1 and 2 is: " . greater(2,1);
?>
A relevant fact that should be noted is that the variables that we declare within the function will only exist or have that value within the function.
Another thing to take into account, is that right now, if we call the functions with the params: echo greater(2,'1');
The script will run without errors, despite one of the parameters being a string.
Most of the time, it’s a good idea to declare the type of parameters that the function expects. Rewrite the function as follows.
function greater(int $val1, int $val2)
{
    if ($val1 > $val2) {
        return $val1;
    } else {
        return $val2;
    }
}
This is known as type hinting. We still don’t see any error, but the function can be better documented.
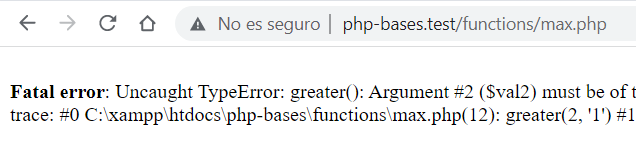
If you want to restrict the values, then we can add this line after the opening php tag:
declare(strict_types = 1);
Now we’ll get an error as shown in Figure 11:
In fact, most of the IDEs should be able to pick this error (Figure 12):
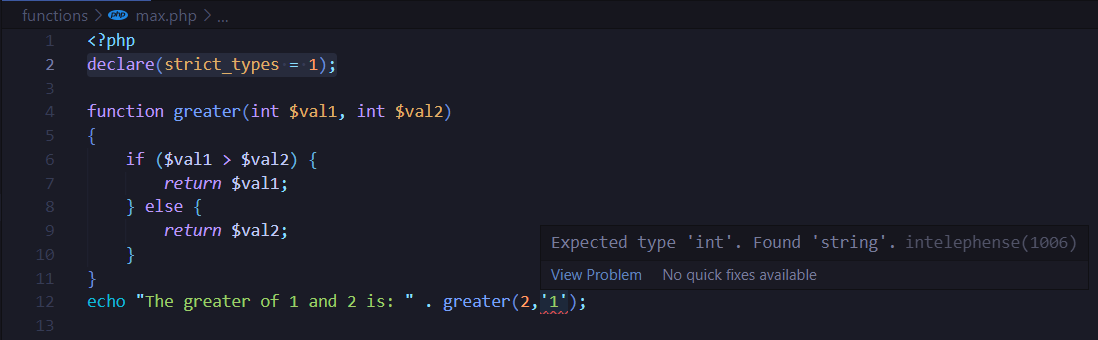
Using strict_types has advantages and disadvantages that we’ll discuss later. For now, we won’t be using strict_types, but we’ll use type hinting.
Besides type hinting, we can declare functions with default values. Create a file called area.php with the following content:
<?php
function get_square_area(int $side_length = 2)
{
    return pow($side_length, 2);
}
echo get_square_area(5);
echo "<br/>";
echo get_square_area();
The first call should print 25, and the second 4.
pow is a built-in function. php has over 1000 functions, and that gives it tremendous power. Of course, it’s impossible to know all these functions by heart, but the number of built-in functions normally used is smaller.
Arrays
In the execution of a script in PHP, on multiple occasions there are variables that have related information. For this, PHP has an element called array.
An array is a set of variables grouped under a single name. Each variable within the array is called an element. Variables of different types can exist within the same array.
It is necessary to differentiate between the two types of existing arrays:
Indexed: The one whose access to the elements is carried out by the position they occupy within the structure (they always start from position 0). Example: $clientes[0]
Associative: It is the one in which the elements are made up of key-value pairs and access is made by providing a specific key. Example: $customers['age']
So, we can now say that superglobals are associative arrays.
There are two ways to create arrays in PHP:
Implicitly, it consists of assigning values to the array indicating the position or key of the element.
Example: $names[0]='Javier';
If you do not indicate a position, the array will take the value following the last value entered.
Example: $names[]='Lucas' /* would take a value of 1 since the last input was 0. */
If $names does not exist, it will be created at the time of the first assignment.
Through array() in which the elements are passed as parameters. In the case of an indexed array, they take the position they occupy in the creation of the array, while those of the associative array are assigned their value by means of "=>".
Example: $client=array('Name'=>'Juan','Last name'=>'Perez');
It should be noted that PHP is not only limited to the existence of arrays but that there are arrays of arrays, or what is the same, multidimensional arrays.
Example: $friends[2]['Pedro'];
Traversing an array
We have several tools to be able to access the elements of an array
At each moment a reference of the element of the array to which we have access is maintained, therefore, to traverse an array it will suffice to modify said reference. In the case of an indexed array, the traversal will be carried out through a loop and for this we must know the number of total elements that the array has. To do this, we rely on the function count(variable) where “variable” represents the variable from which we want to obtain the number of elements. If “variable” is an array, it returns the number of elements it has, it returns 1 if it only has one element (even if it is not an array) and 0 if it has no value.
Browsing on arrays
When it comes to indexed arrays, navigation is simple since it is only enough to access the element that we want to show, but since it is an associative array, the same treatment cannot be applied. For this, there is a set of prefabricated functions that allow us to carry out a multitude of actions:
Syntax Action
reset(array); The internal pointer returns to the first position
end(array); The internal pointer goes to the last position
next(array); The pointer goes to the next element
prev(array); Access the previous element
current(array); Returns the content of the current element
Insertion of elements
For the insertion of elements inside an array there are a series of functions that allow us to add elements. Among them we highlight:
array_push(matrix,variable1,variableN);
Add elements to the end of the array, and its length is increased by as many elements as have been added. Returns the number of elements in the array.
array_unshift(array,variable1,variableN);
It introduces elements at the beginning of the matrix, displacing the other as many positions as there are elements. Returns the number of elements in the array. array_pad(array,new_size,pad_value);
Fills the array using a supplied value, according to the specified size.
Elimination of elements
array_shift(array);
Removes the first element of the array
array_pop(array);
Removes the last element of the array
array_splice(input,ini_pos,[size],[substitutes]);
It is used to replace or delete the content of an array portion, for this we must specify the position from which we want to start the deletion or replacement, the size or number of elements that will be affected and the substitutes (in case we want to replace it with some item).
array_keys(array,[lookup value]); It is used when we want to eliminate an element whose position we do not know.
array_values(array);
Returns an indexed array with all the values stored in the array passed as a parameter.
Mass manipulation of arrays
array_walk(array, function_name, parameter_list);
It is used to apply the same function to all elements of an array.
Obtaining sub-arrays
array_slice(array,position,size);
Allows to extract a sequence of elements from an array. The parameters to be passed are the matrix from which we want to extract these elements, the position from which the extraction starts and the size of the extraction (positions that we cover from the initial one).
Array Sorting
| Criterion | Function |
|---|---|
| Ascending Sort(Indexed Array) | sort(array) |
| Descending Sort(Indexed Array) | rsort(array) |
| Ascending Sort By Value(Associative Array) | asort(array) |
| Descending Sort By Value(Associative Array) | arsort(array ) |
| Ascending order by key(associative array) | ksort(array) |
| Descending order by key(associative array) | krsort(array) |
Other functions
In this section a series of functions are discussed (not all of them because it would be impossible) that can be useful at a certain moment .
compact() Returns an associative array from an indeterminate number of parameters
extract() Creates variables from associative array
array_unique() Returns array without repeated data as some are removed
array_reverse() Returns array with same elements but in reverse order
shuffle( ) Modifies the order of elements randomly
array_count_values() Returns an associative array containing repetition frequencies of the values of the array
in_array() Allows checking if a value is in the array
array_merge() Combines elements of two arrays into 1.
Forms
Forms are not part of PHP, but of the HTML language. However, since in most cases our scripts will process data coming from forms, we will dedicate a few lines to the HTML code linked to them.
Every form begins with the <FORM ACTION="page_name.php" METHOD="post/get"> tag. With ACTION we indicate the script that is going to process the information that we collect in the form, while METHOD tells us if the user of the form is going to send data through POST (post) or GET (get).
The difference between these two methods lies in the way of sending the data to the page, while the GET method sends the data using the URL, the POST method sends it through the STDIO standard input (POST is therefore safer than GET). Another difference is the size limit. In the case of $_GET is browser dependent, with some of them allowing up until 2000.
The <FORM> tag indicates the end of the form.
From the <FORM> tag come the data input fields that can be:
Text box:
<input type="text" name="name" size="20" value="">
Text box with bars scroll:
<textarea rows="5" name="description" cols="20">
    Is red
</textarea>
Checkbox:
<input type="checkbox" name="change" value="ON">
button:
<input type="radio" value="blue" checked name="color">
Dropdown menu:
<select size="1" name="day">
<option selected value="monday">monday </option>
<option>Tuesday</option>
<option value="Wednesday">Wednesday</option>
</select>
Command button:
<input type="submit" value="submit" name="submit">
Hidden field:
<input type="hidden" name="age" value="30">
This last type of field is especially useful when we want to pass hidden data in a form.
As you may have noticed, all field types have a modifier called name, which is none other than the name of the variable with which the data will be collected in the script indicated by the ACTION modifier of the FORM tag. With value a default value is established.
Next we will see an example.
Create a folder named forms at the same level as the basics and functions folders. Then add a file named forms01.php with this content:
<?php
    $error = [];
    $error["name"] = "";
    $name = "";
    if ($_SERVER['REQUEST_METHOD'] == "POST") {
        if (isset($_POST["name"])
            && trim($_POST["name"]) != "") {
            echo $_POST["name"];
            $name = $_POST["name"];
        } else {
            $error["name"]= "Name is required";
        }
    }
?>
<html lang="en">
<head>
    <meta charset="UTF-8">
    <meta http-equiv="X-UA-Compatible" content="IE=edge">
    <meta name="viewport" content="width=device-width,
        initial-scale=1.0">
    <title>Simple Form</title>
</head>
<body>
    <form action="<?= $_SERVER['PHP_SELF'] ?>"
        method="POST">
        <label for="name">Name</label>
        <input type="text" name="name"
            placeholder="Name" value="<?= $name ?>">
        <span><?= $error["name"] ?></span>
        <input type="submit" value="Send">
    </form>
</body>
</html>
Pay attention to the following line:
$_SERVER is a predefined superglobal variable, containing information about the server where the script is running. To use <?= is equivalent to <?php echo, just a little bit shorter. $_SERVER['PHP_SELF'] refers to the current script. So, we are sending the data to the same file.
The condition:
if ($_SERVER['REQUEST_METHOD'] == "POST") { ... }
Guarantees that the code executes only when there is data sent.
Next, we have:
if (isset($_POST["name"]) && trim($_POST["name"]) != "") { ... }
isset checks if a variable is set, in this case, checks if the superglobal $_POST (which is an array), has a key named “name”. This is because we have an input text whose name is, precisely, “name”.
trim will remove any leading or trailing space.
So, we check if the variable is present and is not empty, and in that case, we print it.
We are ready for a more complex example.
Create a file called forms02.php with the following content:
<?php
    $error = [];
    $error["name"] = "";
    $error["email"] = "";
    $error["message"] = "";
    $name = $email = $message = "";

    if ($_SERVER['REQUEST_METHOD'] == "POST") {
        if (isset($_POST["name"])
            && trim($_POST["name"]) != "") {
            $name = filter_data($_POST["name"]);
        } else {
            $error["name"] = "Name is required";
        }

        if ( isset($_POST["email"])
            && trim($_POST["email"]) != "" ) {
            if (!filter_var($_POST["email"],
                FILTER_VALIDATE_EMAIL)) {
                $error["email"] = "Email is not valid";
            } else {
                $email = trim($_POST["email"]);
            }
        } else {
            $error["email"] = "Email is required";
        }

        if ( isset($_POST["message"])
            && trim($_POST["message"]) != "" ) {
            $message = filter_data($_POST["message"]);
        } else {
            $error["message"] = "Message is required";
        }
    }

    function filter_data($data)
    {
        $data = trim($data);
        $data = stripslashes($data);
        $data = htmlspecialchars($data);

        return $data;
    }
?>
<html lang="en">
<head>
    <meta charset="UTF-8">
    <meta http-equiv="X-UA-Compatible" content="IE=edge">
    <meta name="viewport" content="width=device-width,
        initial-scale=1.0">
    <title>Simple Form</title>
</head>
<body>
    <form action="<?= $_SERVER['PHP_SELF'] ?>"
        method="POST">
        <div>
            <label for="name">Nombre</label>
            <input type="text" name="name"
                placeholder="Name" value="<?= $name ?>">
            <span><?= $error["name"] ?></span>
        </div>


        <div>
            <label for="email">Email</label>
            <input type="email" name="email"
                value="<?= $email ?>">
            <span><?= $error["email"] ?></span>
        </div>
        <div>
            <label for="message">Mensaje</label>
            <textarea name="message" id="" cols="30"
                rows="10"><?= $message ?></textarea>
            <span><?= $error["message"] ?></span>
        </div>
        <input type="submit" value="Send">
    </form>
</body>
</html>
Databases
Most applications that we’ll be working on will interact with some type of persistent storage. One of the most common forms of storing data is a database. There are different types of databases. For all the examples we’ll use MariaDB. MariaDB is a project from the same creator of MySQL. MySQL use to come in the xampp package, but since it was acquired by Oracle the Apache org has replaced it with MariaDB. Fortunately, it is fully compatible.
Let’s open phpMyAdmin typing http://localhost/phpmyadmin on the browser.
Clicking the tab Databases we will see the following screen (Figure 13):
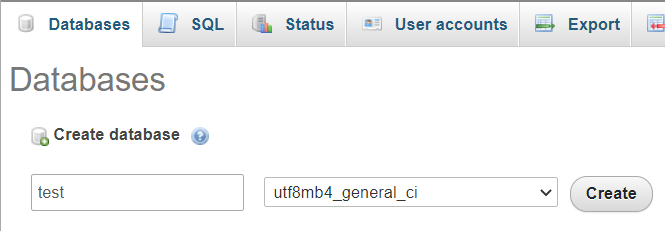
Type “test” as the name of the database and click the Create button.
The next step we’ll be to create a table. We can do it from the following screen (Figure 14):
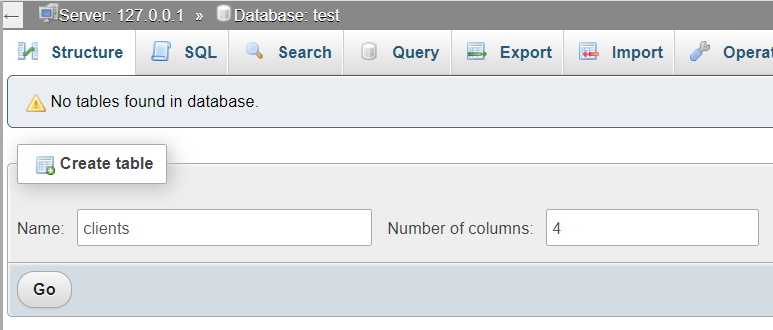
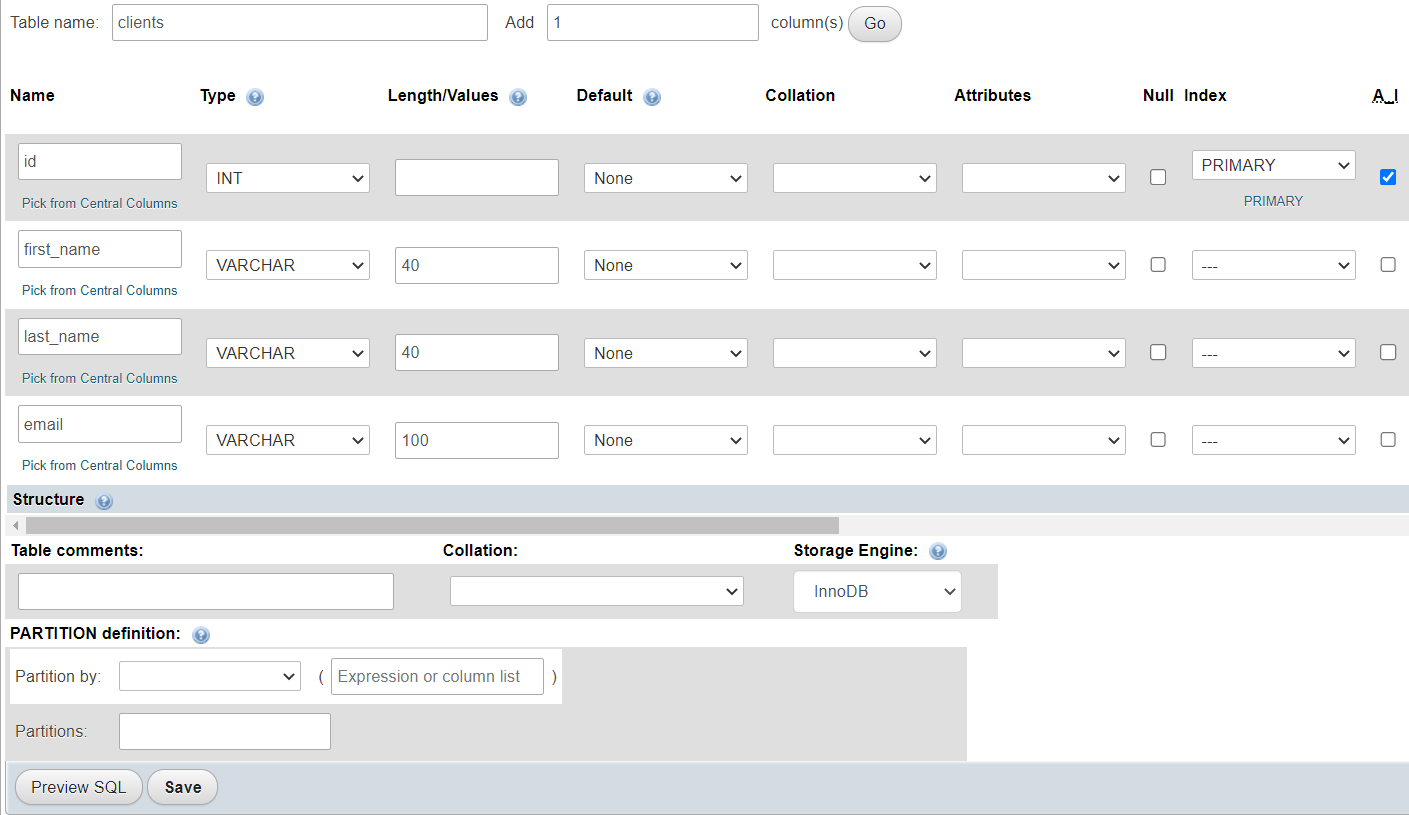
Type “clients” as the table name, leave the number of columns as 4, and press Go. Complete the form as follows (Figure 15):
Then press Save.
We are ready to work.
PHP has different libraries to work with databases. We will be using PDO. PDO is an extension to interact with relational databases. We can establish a connection with a database server, create tables, read and write values in tables, and many others tasks.
Create a folder named databases at the same level as the others.
The add a file called name config.php with the following content:
<?php
$servername = "localhost";
$dbname = "test";
$username = "root";
$password = "";
These variables contain the data necessary to connect with the server and manipulate the database.
Now add a file called connection.php with the following content:
<?php
function get_connection(
    $servername, $dbname, $username, $password
)
{
    try {
        $conn = new PDO(
            "mysql:host=$servername;dbname=$dbname",
            $username,
            $password
        );
        $conn->setAttribute(
            PDO::ATTR_ERRMODE, PDO::ERRMODE_EXCEPTION
        );

        return $conn;
    } catch (PDOException $e) {
        trigger_error(
            "Connection error: " . $e->getMessage(),
            E_USER_ERROR
        );
    }
}
This function uses a try catch block. If the connection can not be set, then the catch block we’ll catch the exception. We display a custom error in that case.
We create an object (we have a complete chapter on oop) of class php. We set the attribute to handle errors, and return the object.
Now we’ll set up a file to handle common functions like insert, update, delete and list data.
Add a file called db.php:
<?php
function insert($conn, array $data, string $table)
{
    $sqlQuery = "INSERT INTO $table SET ";

    foreach ($data as $k => $v) {
        $sqlQuery .= "$k = '$v',";
    }

    $sqlQuery = rtrim($sqlQuery, ",");

    $stmt = $conn->prepare($sqlQuery);

    if ($stmt->execute()) {
        return true;
    }

    return false;
}
Let’s see what this function does. There are two ways we can present an insert statement.
One is:
INSERT INTO table_name (column1, column2, column3,...) VALUES (value1, value2, value3,...)
The other one is:
INSERT INTO table_name SET column1 = value1, column2 = value2, …
We use this second form in the function. In the first sentence we initialize the sentence. Then, we use a foreach loop to extract the key and values of the associative array that we’ll pass to the function to perform the insert. That means an array like this:
["first_name" => "Peter", "last_name" => "Parker", "email" => "test@test.com"]
Note that in the foreach loop:
foreach ($data as $k => $v) {
        $sqlQuery .= "$k = '$v',";
    }
We wrap the values with single quotes. That is necessary for the insert sentence to work. Also, it should be noted that this loop leaves the query with a trailing comma. Now, the rtrim function is normally used to remove unwanted blanks from the right left of a string. But, if we pass it a second parameter, the function will search and remove that character from the right.
Finally, we prepare and execute the sentence. To prepare the sentence, allows us to prevent sql injections attacks, and also, prepared sentences will run faster the second time they are cold, thanks to the cache.
Now, is time to write the function to update data:
function update(
    $conn,
    array $data, string $table, $key = null, $value = null
)
{
    $sqlQuery = "UPDATE $table SET ";

    foreach ($data as $k => $v) {
        $sqlQuery .= "$k = '$v',";
    }

    $sqlQuery = rtrim($sqlQuery, ",");

    $sqlQuery .= " WHERE $key = :value";

    $stmt = $conn->prepare($sqlQuery);

    $stmt->bindParam(":value", $value);

    if ($stmt->execute()) {
        return true;
    }

    return false;
}
As you can see, it looks very similar to the previous function. When something like this happens, it is a sign that we need to refactor the code. But first let’s see the difference.
This sentence:
$sqlQuery .= " WHERE $key = :value";
Is necessary to indicate what record should be updated in the database. You may have noted the use of :value.
It’s not a variable (there is no $ sign). This means that “value” will be assigned a value after it has been sanitized.
It’s what we accomplish with:
$stmt->bindParam(":value", $value);
Now, as we mentioned before, we can refactor the code.
Add the following function:
function save(
  $conn, array $data, string $table, $key = null,
    $value = null
)
{
    $sqlQuery = "$table SET ";

    foreach ($data as $k => $v) {
        $sqlQuery .= "$k = '$v',";
    }

    $sqlQuery = rtrim($sqlQuery, ",");

    if ($key) {
        $stmt = $conn->prepare("UPDATE " . $sqlQuery
            . " WHERE $key = :value");
        $stmt->bindParam(":value", $value);
    } else {
        $stmt = $conn->prepare("INSERT INTO "
            . $sqlQuery);
    }

    if ($stmt->execute()) {
        return true;
    }

    return false;
}
We can use this function as a replacement for the other two. However, instead of deleting them, we can rewrite them like this:
function insert($conn, array $data, string $table)
{
    return save($conn, $data, $table);
}

function update(
    $conn,
    array $data, string $table, $key = null, $value = null
)
{
    return save($conn, $data, $table, $key, $value);
}
Now we can put our little library to test. Add a file called test.php with the following content:
<?php
require_once "config.php";
require_once "connection.php";
require_once "db.php";

$conn = get_connection(
    $servername, $dbname, $username, $password
);

if (insert($conn,
    [
        "first_name" => "Peter",
        "last_name" => "Parker",
        "email" => "test@test.com"
    ], "clients")) {
    echo "Data inserted";
}
If we run the script in the browser, we should see the message “Data inserted” displayed.
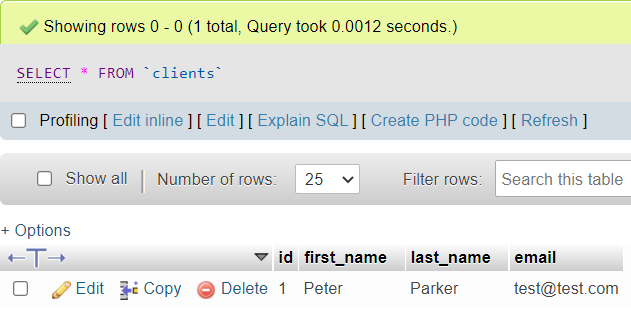
We can see that the data has been inserted in the “clients” table (Figure 16):
Our next step is to be able to read the data. Add the following function to db.php:
function getAll($conn, $table, $data = null)
{
    $sqlQuery = "SELECT ";

    if ($data && is_array($data)) {
        $sqlQuery .= implode(",", $data);
    } else {
        $sqlQuery .= "*";
    }

    $sqlQuery .= " FROM $table";

    $stmt = $conn->prepare($sqlQuery);
    $stmt->execute();

    $stmt->setFetchMode(PDO::FETCH_ASSOC);

    return $stmt->fetchAll();
}
We receive the connection, the table from which to fetch the data, and optionally an array with the fields that we want to retrieve. It’s not common and is not even recommended to retrieve all the fields from a table, for performance and security, but we can do it if we want.
Now is time to put our function to test. Add a file called read.php with this content:
<?php
require_once "config.php";
require_once "connection.php";
require_once "db.php";

$conn = get_connection(
    $servername, $dbname, $username, $password
);

$data = getAll(
    $conn, "clients", ["first_name", "last_name"]
);

print_r($data);
If we run the script, we should get this output (Figure 17):

We are merely printing the two dimensional array with the results, but just as easily we could show an html table, encode the data as json, and so one. This is not the responsibility of the function. We could have another file with utilities, and different formatting functions in it.
Now, in most cases we’ll want to retrieve one record in particular. Let’s write the appropriate function.
function getOne($conn, $table, $key, $value, $data = null)
{
    $sqlQuery = "SELECT ";

    if ($data && is_array($data)) {
        $sqlQuery .= implode(",", $data);
    } else {
        $sqlQuery .= "*";
    }

    $sqlQuery .= " FROM $table WHERE $key = :value";

    $stmt = $conn->prepare($sqlQuery);
    $stmt->bindParam(":value", $value);

    $stmt->execute();

    $stmt->setFetchMode(PDO::FETCH_ASSOC);

    return $stmt->fetch();
}
It’s very similar to the previous function, but we are returning just one record. The supposition here is that “key” represents a field with a unique value for the table. Now add these lines to the read.php file:
$client = getOne(
    $conn, "clients", "id", 1, ["first_name", "last_name"]
);

echo "<pre>";
print_r($client);
echo "</pre>";
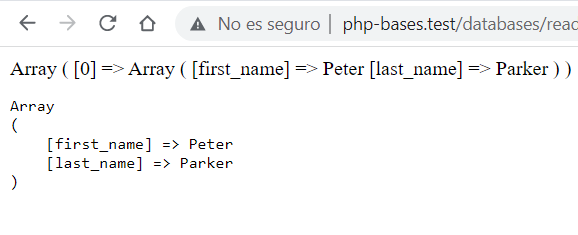
The output should be like this (Figure 18):
It may not seem like much, but we have accomplished a great deal. We can read, insert and update data. The last piece is a function to delete data:
function delete($conn, $table, $key, $value)
{
    $sqlQuery = "DELETE FROM $table WHERE $key = :value";

    $stmt = $conn->prepare($sqlQuery);
    $stmt->bindParam(":value", $value);

    if ($stmt->execute()) {
        return true;
    }

    return false;
}
Now you can play around with these functions. Try to insert, update, read and delete data. There is no other way to improve than to practice.
Summary
In this chapter we've covered the installations needed to configure our development enviroment, and started learning the language.
The next chapter will deal with object oriented programming (OOP). It is a tremendously popular paradigm, and rightfully so, and is a requisite if you want a job as a developer. We’ll go step by step until you feel comfortable with it. See you soon.