Chapter 07: First application
Primera aplicacion sobre el framework: modelos, controladores, vistas, formularios, layout y DataTables.
{sample: true}
Chapter 07: First application
In this chapter, we’ll build a very simple application that performs CRUD operations upon a single table. The purpose of this is to have some example functional code that you can use to build the controllers specific to your application.
As you had noted, we don’t have a database yet, so the first step is to create our “simplemvc” database. You can see how that is done using phpMyAdmin in figure 32:
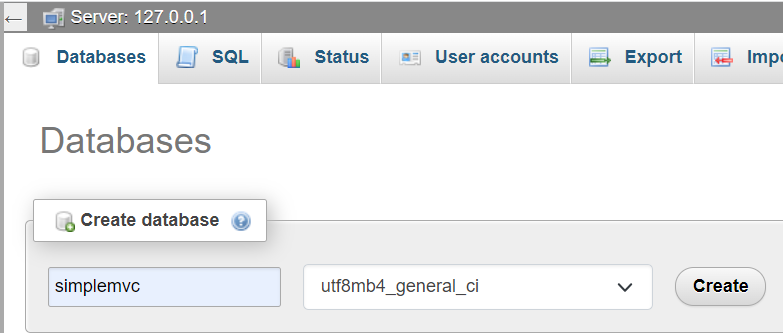
Simply click Create leaving the default character collation.
Next is creating the table, we’ll call it “clients”. Go to the SQL and use the following command:
CREATE TABLE `clients` (
  `id` int(11) NOT NULL AUTO_INCREMENT,
  `firstname` varchar(30) NOT NULL,
  `lastname` varchar(30) NOT NULL,
  `email` varchar(50) DEFAULT NULL,
  `reg_date` timestamp NOT NULL
    DEFAULT CURRENT_TIMESTAMP ON UPDATE CURRENT_TIMESTAMP,
  `image_path` varchar(200) DEFAULT NULL,
  PRIMARY KEY (id)
);
You should see the newly created table. Now we are ready to create our model, controller and views.
The Client Model
Inside application -> models create a file named Client.php with the following content:
<?php
namespace models;
use core\Model as Model;


class Client extends Model {
    private $firstname;
    private $lastname;
    private $email;


    public function __construct($table)
    {
        $this->table = $table;


        parent::__construct($this->table, $this->db);
        $this->key = 'id';
    }


    public function setFirstName($firstName)
    {
        $this->firstname = $firstName;
    }


    public function setLastName($lastName)
    {
        $this->lastname = $lastName;
    }


    public function setEmail($email)
    {
        $this->email = $email;
    }


    public function getFirstName()
    {
        return $this->firstname;
    }


    public function getLastName()
    {
        return $this->lastname;
    }


    public function getEmail()
    {
        return $this->email;
    }
}
Nothing much. Our class extends from the core Model class. We define private properties corresponding to the table fields susceptible to change and the corresponding getters and setters. One thing to take note of is the constructor.
It takes the name of the table the model we’ll be attached to.
The we have this line:
parent::__construct($this->table, $this->db);
We don’t have a db property in the Client model, but it is defined in the base class. Then we have:
$this->key = 'id';
This is necessary to establish the name of the primary key of the table. We could define a default value in the base model class.
On to the Controller.
The ClientController
In application -> controllers create a file named ClientController.php with the following content:
<?php
namespace controllers;


use core\Controller as Controller;
use models\Client as Client;
use core\View as View;
use core\db as db;


class ClientController extends Controller {
    private $client;
    private $view;
    private $db;


    public function __construct()
    {
        $this->client = new Client('clients');
        $this->view = new View('clients');
    }


    public function index()
    {
        $this->view->setAction('index');
        $this->view->render();
    }
}
Let’s see what’s going on here.
Note this line in the constructor:
$this->client = new Client('clients');
We don’t see a __construct function in our Client model, but if you remember, the core Model class has the constructor defined as follows:
public function __construct($table)
    {
        $this->table = $table;
        $this->db = new db(CONFIG);
    }
So as you can see, it receives the table name as a parameter. Clients inherited this behavior from its parent class.
The next line of the constructor:
$this->view = new View('clients');
Instantiates a view object. The parameter will ultimately make reference to a folder inside the application -> views directory. So, we need to create that folder and name it clients.
Each method of our ClientController will render a view that will correspond to a file inside the clients folder. We can see this in our index method:
public function index()
    {
        $this->view->setAction('index');
        $this->view->render();
    }
As you can deduce, we need to create the index.php file inside the application -> views -> clients folder. For now, we’ll simply display a message. Inside index.php:
<h1>Clients</h1>
Just to be sure, our application folders should look like the ones shown in figure 33:
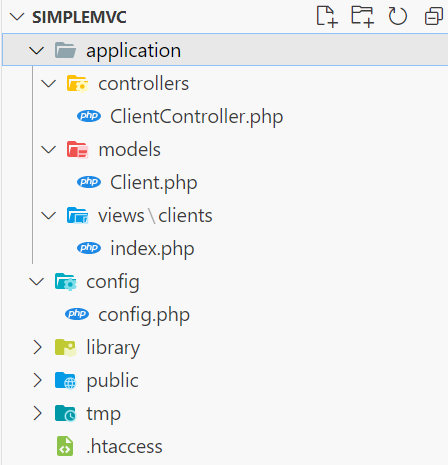
Now if you visit http://simplemvc.test/client/index in the browser, you’ll get the following output (Figure 34).

Now, the index method should be used to list the table records, but we don’t have any yet. Go ahead and add some clients, you don’t need to introduce a value for the reg_date field as it defaults to the current date.
Now we can modify the index method as follows:
public function index()
    {
        $clients = $this->client->all();
        $this->view->setAction('index');
        $this->view->set('clients', $clients);
        $this->view->render();
    }
And the index view:
<h1>Clients</h1>
<table>
    <thead>
        <tr>
            <th>First Name</th>
            <th>Last Name</th>
            <th>Email</th>
        </tr>
    </thead>
    <tbody>
        <?php
        foreach ($clients as $client):
        ?>
            <tr>
                <td><?= $client["firstname"]; ?></td>
                <td><?= $client["lastname"]; ?></td>
                <td><?= $client["email"]; ?></td>
            </tr>
        <?php endforeach; ?>
    </tbody>
</table>
Now we can see our clients in a table (Figure 35):
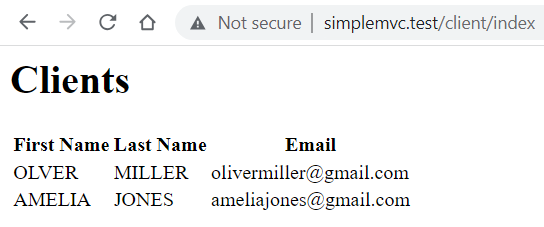
Of course, this approach is not practical for a significant number of records, but we’ll fix it later. We are now ready to display the details of a single client.
First, we need to change the properties definitions of our Client model:
public $id;
    private $firstname;
    private $lastname;
    private $email;
    public $reg_date;
    public $image_path;
We need to declare some properties as public so we won’t get an error when we load the model. We can fix that later. Now add the following method to ClientController:
public function view($id)
    {
        $client = $this->client->loadModel($id);


        if ($client) {
            $this->view->setAction('view');
            $this->view->set('client', $client);
            $this->view->render();
        }
    }
And we need to add the view. In application -> views -> clients add a file named view.php with the following content:
<h2><?= $client->firstname . ' '
    . $client->lastname; ?></h2>
<?php
echo $client->email;
Now if we go to http://simplemvc.test/client/view/1 we should be able to see the details of the client with id 2. If we type an id that is not existent, then we’ll get a blank screen.
We need to link the index view, with the details view. Change the contents of the index view as follows:
<h1>Clients</h1>
<table>
  <thead>
      <tr>
          <th>First Name</th>
          <th>Last Name</th>
          <th>Email</th>
          <th>Actions</th>
      </tr>
  </thead>
  <tbody>
      <?php
      foreach ($clients as $client):
      ?>
        <tr>
          <td><?= $client["firstname"]; ?></td>
          <td><?= $client["lastname"]; ?></td>
          <td><?= $client["email"]; ?></td>
          <td>
            <a href="<?= SITE_BASE.'client/view/'
                .$client['id'] ?>">View</a>
          </td>
        </tr>
      <?php endforeach; ?>
  </tbody>
</table>
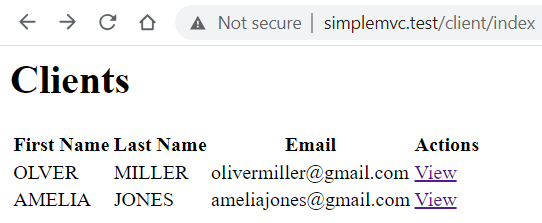
It should give us the output shown in Figure 36:
We can move now to adding a new record. Add the following method in ClientController:
public function add()
{
  if ($_SERVER["REQUEST_METHOD"] == 'POST') {
    $data = [
      'firstname' => $_POST["firstname"],
      'lastname' => $_POST["lastname"],
      'email' => $_POST["email"]
    ];


    $this->client->load($data);
    $this->client->save();

    header('Location: ' . SITE_BASE . 'client/index/');
    exit;
  }

  $this->view->setAction('add');
  $this->view->set('client', $this->client);
  $this->view->render();
}
Next is time to add the view. Create a file named add.php with the following content:
<form action="<?= SITE_BASE ?>client/add" method="POST">
  <div>
    <label for="firstname">First Name:</label>
    <input type="text" name="firstname"
        value="<?= $client->firstname ?>">
  </div>
  <div>
    <label for="lastname">Last Name:</label>
    <input type="text" name="lastname"
        value="<?= $client->lastname ?>">
  </div>
  <div>
    <label for="email">Email:</label>
    <input type="text" name="email"
        value="<?= $client->email ?>">
  </div>
  <button type="submit">Save</button>
</form>
Now go ahead and visit http://simplemvc.test/client/add
You should see the form shown in Figure 37:
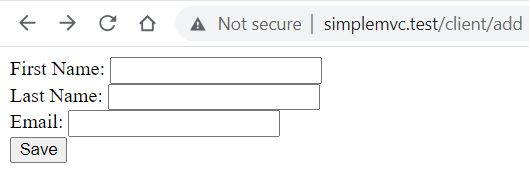
Go ahead and fill the form. The application will redirect you to the index with the new record added.
We can add a link to add a new client in the index view. Right under the h1 title:
<a href="<?= SITE_BASE ?>/client/add">New Client</a>
On to the edit method:
public function edit($id)
{
  if ($_SERVER["REQUEST_METHOD"] == 'POST') {
    $data = [
      'firstname' => $_POST["firstname"],
      'lastname' => $_POST["lastname"],
      'email' => $_POST["email"]
    ];


    $this->client->load($data);
    $this->client->save();

    header('Location: ' . SITE_BASE . 'client/index/');
    exit;
  }

  $this->client->loadModel($id);
  $this->view->setAction('edit');
  $this->view->set('client', $this->client);
  $this->view->render();
}
It’s almost identical. The edit view. Create a file named edit.php with the following content:
<form action="<?= SITE_BASE ?>client/edit/<?= $id ?>"
  method="POST">
  <div>
    <label for="firstname">First Name:</label>
    <input type="text" name="firstname"
        value="<?= $client->firstname ?>">
  </div>
  <div>
    <label for="lastname">Last Name:</label>
    <input type="text" name="lastname"
        value="<?= $client->lastname ?>">
  </div>
  <div>
    <label for="email">Email:</label>
    <input type="text" name="email"
        value="<?= $client->email ?>">
  </div>
  <button type="submit">Save</button>
</form>
Again, almost identical. The only difference is the action. It’s time to do some refactoring.
Let’s move the field definitions to a partial view. Create a file called _form.php:
<div>
  <label for="firstname">First Name:</label>
  <input type="text" name="firstname"
    value="<?= $client->firstname ?>">
</div>
<div>
  <label for="lastname">Last Name:</label>
  <input type="text" name="lastname"
    value="<?= $client->lastname ?>">
</div>
<div>
  <label for="email">Email:</label>
  <input type="text" name="email"
    value="<?= $client->email ?>">
</div>
<button type="submit">Save</button>
Now we can rewrite add.php:
<form action="<?= SITE_BASE ?>client/add" method="POST">
  <?php include '_form.php'; ?>
</form>
And edit.php
<form action="<?= SITE_BASE ?>client/edit/<?= $id ?>"
    method="POST">
  <?php include '_form.php'; ?>
</form>
Finally, we need to add the edit links to every row. I’ll paste the entire index.php content:
<h1>Clients</h1>
<a href="<?= SITE_BASE ?>client/add">New Client</a>
<table>
  <thead>
    <tr>
      <th>First Name</th>
      <th>Last Name</th>
      <th>Email</th>
      <th>Actions</th>
    </tr>
  </thead>
  <tbody>
    <?php
    foreach ($clients as $client):
    ?>
      <tr>
        <td><?= $client["firstname"]; ?></td>
        <td><?= $client["lastname"]; ?></td>
        <td><?= $client["email"]; ?></td>
        <td>
          <a href="<?= SITE_BASE.'client/view/'
            .$client['id'] ?>">View</a>
          <a href="<?= SITE_BASE.'client/edit/'
            .$client['id'] ?>">Edit</a>
        </td>
      </tr>
    <?php endforeach; ?>
  </tbody>
</table>
It’s time to add the functionality to delete records. Since we want to prevent an accidental deletion, we’ll add this line in the actions columns:
<a href="#" onclick="confirm_delete(<?= $client['id'] ?>)">Delete</a>
We are calling a JavaScript function that will display a confirmation message. Add this at the top of index.php:
<script>
function confirm_delete(id)
{
  if (
    confirm("Are you sure you want to delete this record?")
  ) {
    location.href = "<?= SITE_BASE ?>client/delete/"+id;
  }
}
</script>
Now go back to the ClientController and add the following method:
public function delete($id)
{
    $this->client->del("id", $id);
    header('Location: ' . SITE_BASE . 'client/index/');
    exit;
}
We use the Model’s delete method, and then redirect to the index page.
Adding a main layout
Take a look at the render method in the View class of the core folder:
public function render($main = true, $scripts = '')
{
  extract($this->variables);
  include ROOT . DS . 'application'. DS . 'views'
    . DS . $this->controller . DS . $this->action
    . '.php';
}
We are declaring a $main parameter that we’re not using yet. We’ll use it to conditionally show a main layout for our site. Rewrite the method as follows:
public function render($main = true, $scripts = '')
{
  extract($this->variables);


  if ($main == true) {
    ob_start();
    include ROOT . DS . 'application'. DS . 'views'
      . DS . $this->controller . DS . $this->action
        . '.php';
    $content = ob_get_clean();


    include ROOT . DS . 'application'. DS . 'views'
      . DS . 'layouts' . DS . 'main.php';
  } else {
    include ROOT . DS . 'application'. DS . 'views'
      . DS . $this->controller . DS . $this->action
        . '.php';
  }
}
We see some things that need an explanation.
The function ob_start() opens a buffer and stores the output. So, in the next line when we include the view file, the contents of the file are not automatically displayed but stored in the buffer.
Then we do
$content = ob_get_clean()
Storing the buffer contents in the variable.
Then we include a main view, that is expected to be found in a layouts folder.
Create a folder called layouts in views, and then inside that folder add a file called main.php with the following contents:
<html lang="en">
<head>
  <meta charset="UTF-8">
  <meta name="viewport" content="width=device-width,
    initial-scale=1.0">
  <link rel="stylesheet"
    href="<?= SITE_BASE ?>css/main.css">
  <title>SimpleMVC</title>
</head>
<body>
  <?= $content ?>
</body>
</html>
We make reference to a css file, but we don’t have it yet. Go to the public folder, and then the css folder. Create a file called main.css with the following content:
body {
    font-family: Arial, Helvetica, Serif;
    font-size: 14px;
}

table {
    width: 50%;
    border-collapse: collapse;
    text-align: center;
}

a {
    text-decoration: none;
}

table thead tr th {
    background-color: #73d488;
    border: 1px solid #ccc;
    padding: 5px;
}

table tbody tr td {
    border: 1px solid #ccc;
}

form  {
    width: 50%;
}

input[type=text], select, textarea {
    width: 100%;
    padding: 12px;
    border: 1px solid #ccc;
    border-radius: 4px;
    resize: vertical;
}

input[type=email] {
    width: 100%;
    padding: 12px;
    border: 1px solid #ccc;
    border-radius: 4px;
    resize: vertical;
}

label {
    padding: 12px 12px 12px 0;
    display: inline-block;
    font-weight: bold;
}

button[type=submit] {
    width: 100%;
    background-color: #04AA6D;
    color: white;
    padding: 12px 20px;
    border: none;
    border-radius: 4px;
    cursor: pointer;
    font-weight: bold;
    font-size: 16px;
}

.boton {
    padding: 10px 10px;
    background-color: #73d488;
    color: white;
    text-decoration: none;
    display: inline-block;
    border-radius: 2px;
}
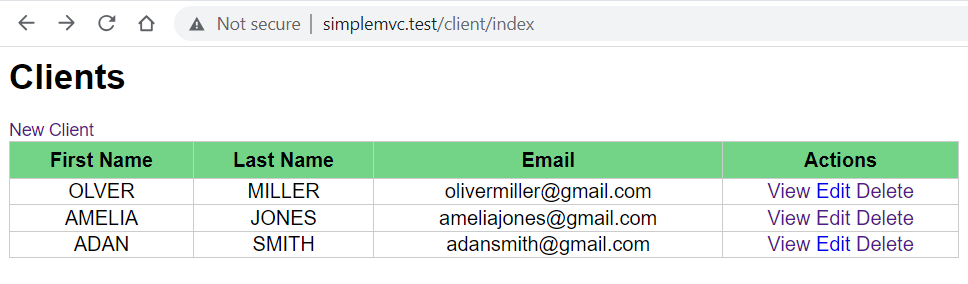
If we now refresh the page, we should see something like this (Figure 38):
And the form (Figure 39):
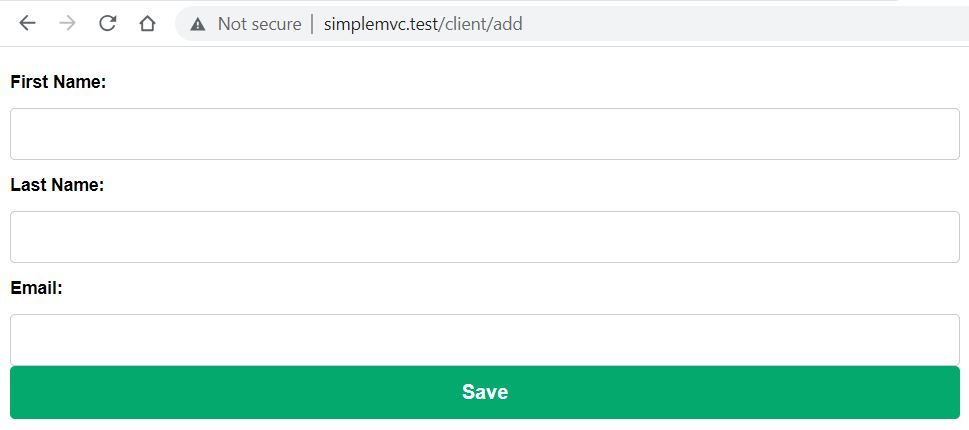
Far from perfect, but it’s certainly better.
DataTable widget
I want to finish this chapter introducing a widget. Let’s analyze this situation: suppose we have a table with hundreds or even thousands of clients. We will need to write the logic to paginate the results. And we need to code the search and order functionality every time we need something similar.
We can make use of some useful plugin called jquery datatable. The initialization is very simple, and with just a line of code we can have a table with pagination, search and order capabilities. But if you want to implement these functions on the server side, it’s a bit more complicated.
Let’s start rewriting a the main.php layout as follows:
<html lang="en">
<head>
  <meta charset="UTF-8">
  <meta name="viewport" content="width=device-width,
    initial-scale=1.0">
  <script
  src="https://code.jquery.com/jquery-3.7.0.min.js"
  integrity
  ="sha256-2Pmvv0kuTBOenSvLm6bvfBSSHrUJ+3A7x6P5Ebd07/g="
  crossorigin="anonymous"></script>
  <link rel="stylesheet"
    href="<?= SITE_BASE ?>css/main.css">
  <link rel="stylesheet"
  href
  ="//cdn.datatables.net/1.13.4/css/jquery.dataTables.min.css">
  <script
  src="https://cdn.jsdelivr.net/npm/sweetalert2@11">
  </script>
  <title>SimpleMVC</title>
</head>
<body>
  <?= $content ?>
  <script
  src="//cdn.datatables.net/1.13.4/js/jquery.dataTables.min.js">
  </script>
  <script type="text/javascript">
    <?= $scripts; ?>
  </script>
</body>
</html>
Now, the text word wrapping could cause problems, so I will provide a gist
We are including jquery and the jquery datatable stylesheets in the head. We also are adding SweetAlert, which is a beautiful replacement for the default JavaScript popup.
Let’s open the widgets folder, and create a file named DataTable.php with the following content:
<?php
namespace widgets;

class DataTable
{
    private $cols = [];
    private $key = '';
    private $controller;

    public function __construct($cols, $key, $controller)
    {
        $this->cols = $cols;
        $this->key = $key;
        $this->controller = $controller;
    }

    public function render()
    {
        $cols = $this->cols;
        $controller = $this->controller;
        $key = $this->key;


        ob_start();
        include 'datatableview.php';
        echo ob_get_clean();
    }
}
This is the class definition of our widget. It takes the names of the fields of the table, the primary key of the table, and the name of the controller.
Then it includes the view. Add the datatableview.php with the following content:
<div>
  <table id="data-table">
      <thead>
      <tr>
        <?php
        $i = 0;
        $col_data = "";
        foreach ($cols as $col) {
          if ($col != $key) {
            echo "<th>"
              . ucwords( str_replace("_", " ", $col) )
              . "</th>";
            $col_data .= '{"data": '.$i.'},';
          }
          $i++;
        }
        ?>
        <th>View / Edit / Delete</th>
      </tr>
      </thead>
  </table>
</div>
<script>
function del(id) {
  Swal.fire({
    title: 'Are you sure you want to delete this record?',
    icon: 'warning',
    showCancelButton: true,
    confirmButtonColor: '#3085d6',
    cancelButtonColor: '#d33',
    confirmButtonText: 'Si',
    cancelButtonText: 'No'
  }).then((result) => {
    if (result.isConfirmed) {
      var param = {
        "id" : id
      };
      $.ajax({
        type: "POST",
        url: '<?= SITE_BASE . $controller ?>/delete',
        data: param,
        success:  function (response) {
          if (response == "success") {
            table.ajax.reload();
          }
        }
      });
    }
  });
}
</script>
It looks more complex than it really is. We have these lines:
$i = 0;
foreach ($cols as $col) {
    if ($col != $key) {
         echo "<th>"
            . ucwords( str_replace("_", " ", $col) )
            . "</th>";
    }
    $i++;
}
For each of the columns, we create a table column with the name of the fields capitalized.
Go back to the ClientController and the following line:
use widgets\DataTable as DataTable;
And then rewrite the index method as follows:
public function index()
{
  /*$clients = $this->client->all();
  $this->view->setAction('index');
  $this->view->set('clients', $clients);
  $this->view->render();*/

  $dataTable = new DataTable(
  ['firstname', 'lastname', 'email', 'id'], 'id', 'client'
  );

  $this->view->setAction("index");
  $this->view->set('grid', $dataTable);

  $scripts = <<<scripts
  $( document ).ready(function() {
    table = $('#data-table').DataTable({
      "ajax":{
        url :"/client/data", // json datasource
        type: "post"  // type of method, GET/POST/DELETE
      },
      columns: [
        {"data": 0},{"data": 1},{"data": 2}, {
          data: null,
          orderable: false,
          searchable: false,
          className: "center",
          render: function (data, type, full, meta) {
            return '<a href="/client/view/'+data[3]
                +'" title="View">View</a>' + ' ' +
              '<a href="/client/edit/'+data[3]
                +'" title="Edit">Edit</a>' + ' ' +
              '<a href="javascript: void(0);"
                title="Delete" onclick="del('+data[3]+')">
                Delete
              </a>';
          }
        }
      ]
    });
  });
  scripts;
  return $this->view->render(true, $scripts);
}
Note that the previous content is commented out in case you want to reuse it in the future.
Let’s see what’s going on. First we initialize the widget:
$dataTable = new DataTable(
  ['firstname', 'lastname', 'email', 'id'], 'id', 'client'
);
We will display the firstname, lastname and the email. The id is necessary to call to the view, update and delete methods.
Then we have:
$this->view->setAction("index");
$this->view->set('grid', $dataTable);
We set the corresponding action, and pass the datatable as a variable named grid.
Then we have:
$scripts = <<<scripts
$( document ).ready(function() {
  table = $('#data-table').DataTable({
    "ajax":{
      url :"/client/data", // json datasource
      type: "post"  // type of method, GET/POST/DELETE
    },
    columns: [
      {"data": 0},{"data": 1},{"data": 2}, {
        data: null,
        orderable: false,
        searchable: false,
        className: "center",
        render: function (data, type, full, meta) {
          return '<a href="/client/view/'+data[3]
            +'" title="View">View</a>' + ' ' +
            '<a href="/client/edit/'+data[3]
            +'" title="Edit">Edit</a>' + ' ' +
            '<a href="javascript: void(0);"
              title="Delete" onclick="del('+data[3]+')">
              Delete
            </a>';
        }
      }
    ]
  });
});
scripts;
The characters <<< allows us to write a long text, which contains the javascript necessary to initialize the jquery datatable.
The lines:
"ajax":{
    url :"/client/data", // json datasource
    type: "post"  // type of method, GET/POST/DELETE
},
Define the url from which the data to populate the table will be obtained, and the method used to send the ajax petition.
Then we have the columns definition:
{"data": 0},{"data": 1},{"data": 2},
We defined the first 3 columns, that will simply display the data without transformations. The fourth column, however, needs to display the links to View, Delete and Delete.
{
    data: null,
    orderable: false,
    searchable: false,
    className: "center",
    render: function (data, type, full, meta) {
        return '<a href="/client/view/'
          +data[3]+'" title="View">View</a>' + ' ' +
            '<a href="/client/edit/'
          +data[3]+'" title="Edit">Edit</a>' + ' ' +
            '<a href="javascript: void(0);"
              title="Delete" onclick="del('+data[3]+')">
              Delete
            </a>';
    }
}
This column won’t be orderable or searchable, and will render the links to the view and edit methods of the controller. The third link, however, calls the del method that is part of our widget.
Now our index view only needs to have one line of code:
<?php $grid->render(); ?>
You can comment out everything else if you don’t want to delete it.
It won’t work just yet. We need to add the data method to the ClientController:
public function data()
{
  $params = $_REQUEST;

  $where = "";


  $columns = array(
    0 =>'firstname',
    1 =>'lastname',
    2 =>'email',
    3 =>'id'
  );


  $data = [];


  $queryTot = $queryRec = "SELECT firstname,
    lastname, email, id FROM clients";


  // check search value exist
  if( !empty($params['search']['value']) ) {
    $where .=" WHERE ";
    $where .=" ( firstname LIKE '"
      .$params['search']['value']."%' ";
    $where .=" OR lastname LIKE '"
      .$params['search']['value']."%' ";
    $where .=" OR email LIKE '"
      .$params['search']['value']."%' )";


    $queryTot .= $where;
    $queryRec .= $where;
  }


  if( !empty($params['order'][0]) ) {
    $queryRec .= " ORDER BY "
      . $columns[$params['order'][0]['column']]." "
      .$params['order'][0]['dir']." LIMIT "
      .$params['start']." ,".$params['length']." ";
  }


  $this->db = new db(CONFIG);


  $clients = $this->db->query($queryRec);


  foreach ($clients as $client) {
    foreach ($client as $key => $value) {
      $item[] = $value;
    }
    $data[] = $item;
    $item = [];
  }


  $totalRecords = count($this->db->query($queryTot));


  $draw = ( !empty($params['draw']) )
    ? intval( $params['draw'] )
    : false;


  $json_data = array(
    "draw"            => $draw,
    "recordsTotal"    => intval( $totalRecords ),
    "recordsFiltered" => intval($totalRecords),
    "data"            => $data   // total data array
  );


  echo json_encode($json_data);  // send data as json
  exit;
}
The line:
$params = $_REQUEST;
Allows us to capture the request sent by the jquery datatable plugin. This request may contain the column the user wants to order by, or the string search to filter records.
In:
$params['search']['value']
We have the value that the user has entered in the search box. We can add the corresponding conditions to the query based on that:
if( !empty($params['search']['value']) ) {
  $where .=" WHERE ";
  $where .=" ( firstname LIKE '"
    .$params['search']['value']."%' ";
  $where .=" OR lastname LIKE '"
    .$params['search']['value']."%' ";
  $where .=" OR email LIKE '"
    .$params['search']['value']."%' )";


  $queryTot .= $where;
  $queryRec .= $where;
}
Something similar happens to the order criteria:
if( !empty($params['order'][0]) ) {
    $queryRec .= " ORDER BY "
      . $columns[$params['order'][0]['column']]
      ." ".$params['order'][0]['dir']." LIMIT "
      .$params['start']." ,".$params['length']." ";
}
The last lines send the data as json:
echo json_encode($json_data);  // send data as json format
exit;
There is one more method we need to change:
public function delete()
{
    /*$this->client->del("id", $id);
    header('Location: ' . SITE_BASE . 'client/index/');
    exit;*/


    if (!isset($_REQUEST["id"])) {
        echo "error";
    } else {
        if ($this->client->del("id", $_REQUEST["id"])) {
            echo "success";
        } else {
            echo "error";
        }
    }
    exit;
}
Just to be sure, here is the complete gist of the ClientController.
You should get an output similar to the one shown in Figure 40.
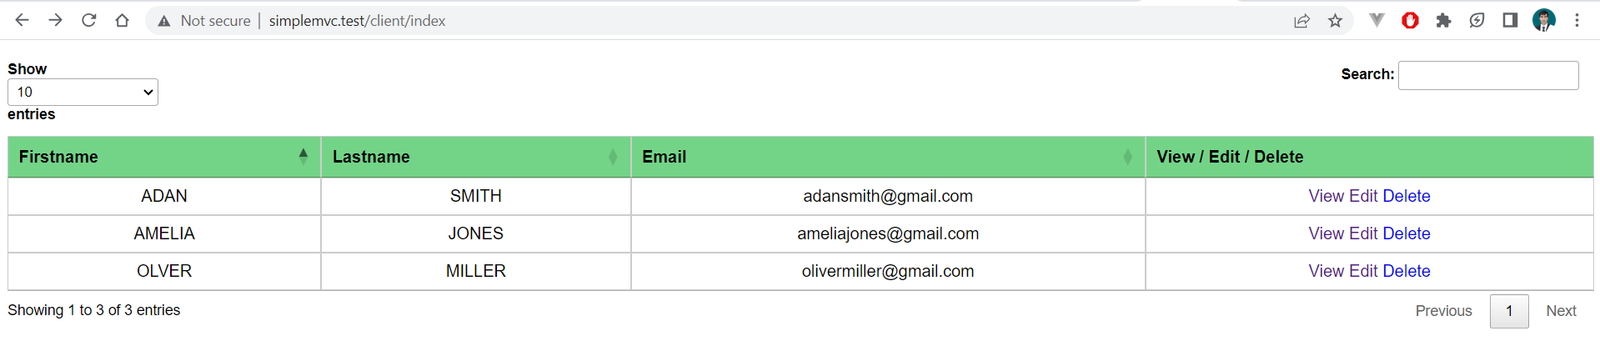
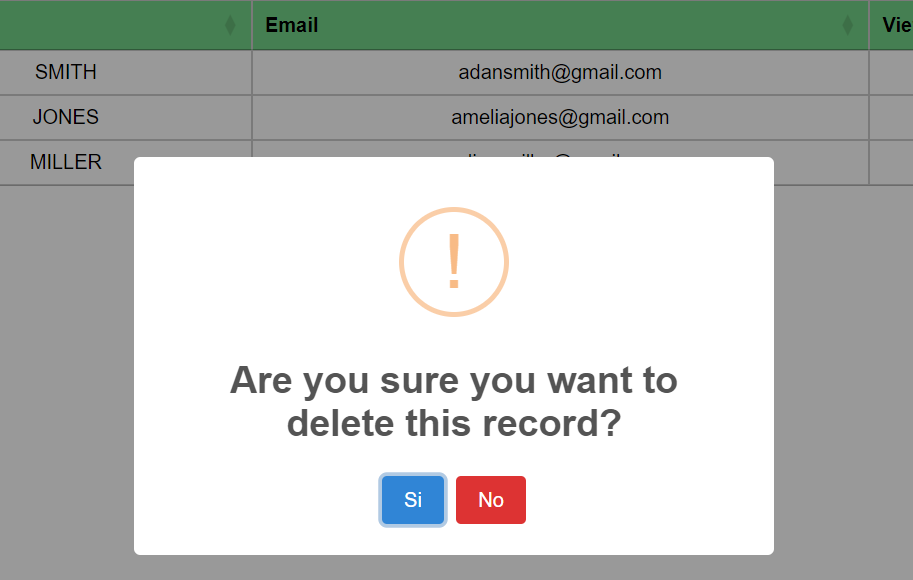
Go ahead, you can try to search and order. If you click the Delete link you should see the confirmation message (Figure 41):
Summary
In this chapter we built a very simple but functional application. We learned how to perform CRUD operations upon a table, add a main layout with some style, and then move on to introduce the use of one very useful widget.
I hope you are beginning to have a taste of how this framework can help us to build applications. It’s not production ready yet, but we have come a long way.
See you in the next chapter!